In part 1, we addressed basic 2-handed manipulations of common semi-automatic handguns for left-hand dominant shooters. Now let’s talk about one-handed manipulations specific to the left hand. As a left or right-handed shooter, who knows which hand you will have to use for this? For the sake of argument, let’s say that it is the left hand, as right-handed manipulations have been covered more than adequately by other sources. Keep in mind that this is increasing the level of difficulty, so a corresponding increase of good sense is needed while practicing or executing these moves to prevent injury to yourself or someone else, maybe someone you don’t intend to injure, so…be careful.

When the firearm is canted, the line of bore is no longer directly beneath the sights, which has almost zero effect at typical handgun distances. Stretch that out to 50 or 100 yards and with some sight configurations, you may start to run into alignment problems, which stack up on top of the bigger problem, which is that you’re shooting a handgun at 50 or 100 yards, and one-handed at that. I hear the screaming already: “Well that’s insane?! No one should use a pistol to fire shots at those distances! Everyone knows 99% of all gunfights happen at bad breath distance and no one uses the sights anyway!” Look, you are free to believe whatever you want, but I will keep practicing 50 and 100 yard shots with my handgun.
Following the format of the previous article, let’s discuss manipulation of each of the 4 major user inputs on standard defensive handguns, only this time in the context of left-hand only:
TRIGGER:
Accessing the trigger is no big deal with one-handed shooting, in fact it may be a little too easy, so we need to be extra careful to maintain trigger finger discipline because the confusion created by the novelty of adjusting the grip with one hand often enables some sympathetic finger movement. We all know that you should have established the firm firing grip while the gun was still in the holster, but the fact you are shooting with one hand, possibly the non-dominant hand, brings up the possibility that you had to draw the firearm from an awkward position to begin with, or pick it up after dropping it, etc… The point is, don’t inadvertently press the bang switch while trying to get a grip on the gun.
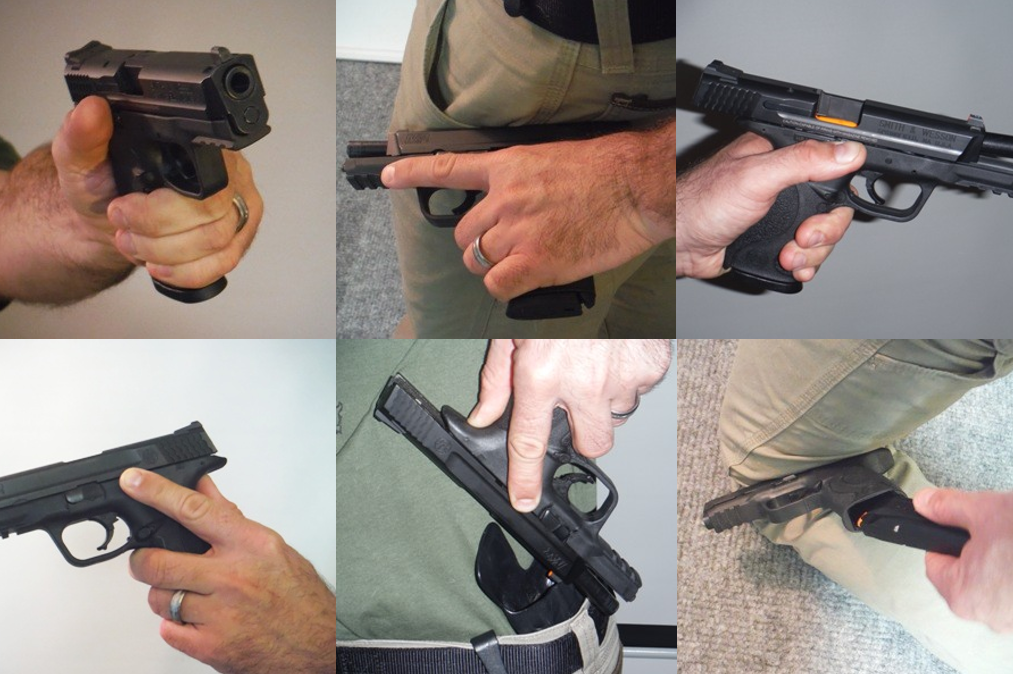
SLIDE:
The nice thing about one-handed slide manipulations is that we don’t have to worry about the palmar grip/lateral pinch arguments anymore… sort of. The primary technique of racking the slide with one hand involves hooking the rear sight on something like your belt, pocket, holster or other stationary object to hold the slide steady and, being careful not to muzzle yourself, pushing the grip forward sharply to cycle the action.

Ramped rear sights complicate this. Since sharp edged sights can result in owies to the hand when racking the slide using the palmar grasp or doing diagnostic clearing techniques like the “stovepipe sweep,” the leading edge of many rear sights are angled or “ramped” to reduce the drag. Well…damn… that “drag” is what facilitates the one-handed slide rack. Look, you don’t really need the rear sight to do it, you can use the edge of the slide where it meets the barrel, or if you press hard enough the friction of the slide itself will do the job, it just takes a hell of a lot more work. Come on, it’s hard enough doing this stuff left-handed anyway without designs based on impious doctrine making matters more difficult. These types of ramped sights are found most commonly on 1911’s, not that that has anything to do with the proclivity of mass-produced 1911’s to stovepipe or anything, but I digress.
SLIDE LOCK:
Before we get started with this, realize that locking the slide might fall under the category of administrative actions in the majority of circumstances and there is absolutely no need to perform an “administrative” action one-handed. In fact, some schools of thought encourage one to not handle a firearm “administratively.” If you need to lock the slide one-handed because of a type 3 malfunction, AKA double feed, AKA failure to extract, this is how you can do it. Technically, you shouldn’t have to lock the slide to clear this malfunction though, so… I include this information only as a point of interest.


It would be better and safer to use something not attached to you, like whatever you are hiding behind, to hook the front sight on, but if necessary you can use the edge of a holster or the sole of a shoe as long as you keep the gun pointed away from you. As always: muzzle, muzzle, muzzle! None of these techniques involve pointing the muzzle at yourself. This is a big deal. Blowing a hole in your leg or foot or in one of your buddies is counterproductive in these situations.
When locking the slide one handed, no matter which way is used, I suggest pressing upwards on the slide lock before attempting to retract the slide. This will cause it to engage the moment the slide gets far enough back. If you retract the slide first, then try to find the slide lock, it can require you to loosen your grip and that usually results in the slide slipping forward. Then you have to start all over again.
MAGAZINE RELEASE:
There isn’t much difference activating the mag release button with the left hand only, compared with using the left hand with right hand support. The only thing that is different is how we strip out the magazine. I recommend always positively stripping out the mag, rather than hoping it will drop free, because debris can wedge the magazine in place, or in the event of a failure to extract (double feed) we will have to strip the mag anyway because the top round will be pinched in the gun.

Once the magazine is out, holster the gun or stick it someplace secure that will hold it firmly while you insert a new magazine. When the magazine is in, run the slide as discussed above to chamber a round, then we are ready to rock.

If anchoring the firearm behind the knee as shown, make sure the muzzle is pointed out, away from the shooter, not inwards.
That covers the basics of one-handed manipulations on semi-automatic handguns. Now, let’s get into malfunction clearance again.
As with 2-handed clearing, we will perform the same sequence of operations on the firearm no matter which type of malfunction we have. Why? Because we don’t know or care what made the gun stop, we just want to make it start again. So:
1. Tap – Tap the magazine firmly to ensure it is fully seated. Since we are using one hand, we will tap it on our hip, leg, or whatever else we have. Avoid doing this on hard surfaces that can cause the baseplate to crack.
2. Rack – hook the rear sight on your holster or belt if you can, it will give you more leverage. If your rear sight doesn’t accommodate this, tough cookies, press the top of the slide hard on to your hip, running perpendicular to your leg, (so you don’t muzzle your knee and foot) then push the gun forward hard to run the slide.
As before, these steps should get the pistol back up and running for the majority of common malfunctions. But since we don’t have the same strength in this technique to run the slide, there is a greater chance we will cause another malfunction, probably a “double feed.”
3. If that happens, strip the magazine on the belt or holster as described above, rack the slide a few times as described in step 2, holster or stow the gun, insert a fresh mag if you can, or retrieve the ejected mag if absolutely necessary, and stick it back in the gun. Obtain a firing grip, rack the slide again as in step 2 to load the gun and get it back in the fight.
Hopefully, these manipulations help with your left-hand technique. In the next article, we will be addressing southpaw techniques applied to revolvers.
This article was originally written for Adaptive Defense Concepts LLC. and is republished here on Spotter Up Tactical by the original author.