
By now, you’re probably thinking “boy, it seems like there’s an awful lot of difficult manipulations involved with semi-autos that aren’t very easy for lefties,” and maybe you’re considering that switching to a wheel-gun may simplify your world somewhat. Because after all, if you have spent any time in gun stores, you know revolvers never jam. I appreciate your thought process, but the fact is that nothing really gets easier with the wheel gun, especially for southpaws. While it is true you won’t wind up with a stovepipe or double-feed in your revolver, I won’t go so far as to say they never jam, which is the common misconception. There are a few ways revolvers can and do malfunction, the majority being ammunition induced, which can be all but eliminated by using high-quality, chamber-checked ammo. There are a few shooter-induced issues we can run into with revolvers as well that we will talk about in the context of left-handed manipulations. The main problem with revolvers, whether you’re dexterous or sinister, is that the bang to click ratio is much smaller with them, in other words, they run out of ammo too damn fast. That is of critical importance because the more frequently the gun runs dry, the more frequently we have to mechanically mess with it to get it back up and running.
Before anyone has a stroke, yes, I’ve read the FBI statistics that indicate the “average” gunfight is three shots at three yards in three seconds. Cool, I get it, but how often does the “average” person get into an “average” gunfight? Is it “average” to blow a tire on your daily commute? No? Well then, why do you have a spare? Why do you have an AAA membership? If you carry a firearm, do you do so because you consider it “average” to get set upon by thugs? …and how many thugs is it average for you to encounter at once? The reason you’re reading this article is probably because you deliberately spend time, money and energy preparing for situations that fall outside of the realm of “average.” So, a 5-shot J-frame may solve your problem just fine, or, it may not. Since that is the world we live in, if you chose to carry a wheel-gun, be aware that reloading it takes more physical manipulations and skill than it does simply jamming a fresh magazine into the grip of an auto-pistol, and being left-handed (also not average, by the way) complicates this slightly.
In the previous articles, we addressed basic 2-handed and 1-handed manipulations of common semi-automatic handguns for left-hand dominant shooters. Now we’ll explore the operation of revolvers in the same way. There are more ways than those I have listed here to accomplish these ends, but these are techniques that work and they are relatively simple.
Also lefties, if you shoot a Colt or other make that rotates the cylinder clockwise, you can get that right thumb pinched between the cylinder flutes and the frame, which probably won’t hurt your thumb, but it can prevent your cylinder from rotating. Righties, that can get you on Smith and Wessons.
Unlike semi-autos, which enable the shooter to maintain a firing grip for all manipulations, revolver manipulations typically involve passing the gun to the non-shooting hand. There are techniques that don’t involve releasing the firing hand, such as those taught by Michael DeBethencourt. I have never trained with Mr. DeBethencourt personally, but from what I have seen (admittedly second-hand), his techniques are designed primarily for righties, which makes sense because that’s how most guns are designed. Interestingly, whereas semi-autos can be manipulated relatively easily with one hand if the other hand is injured, revolvers do not lend themselves well to this.
On semi-autos, we were dealing with 4 user inputs; the trigger, slide, slide catch and mag release.
On wheel-guns, we also have 4 user inputs: the trigger, cylinder release, cylinder and ejector rod.
TRIGGER:
As before, triggers on essentially every revolver in existence are bilateral in placement and operation, ‘nuff said.
CYLINDER & CYLINDER RELEASE:
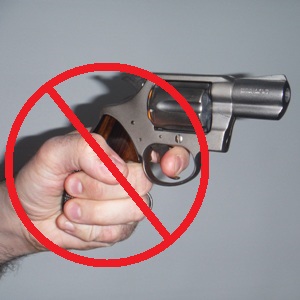
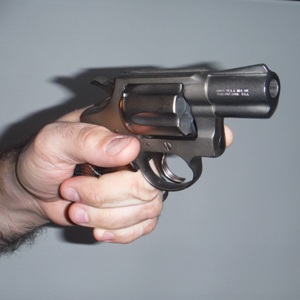
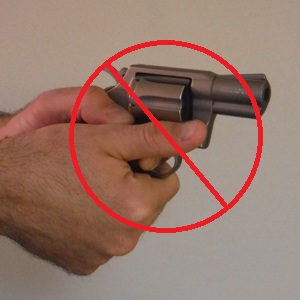
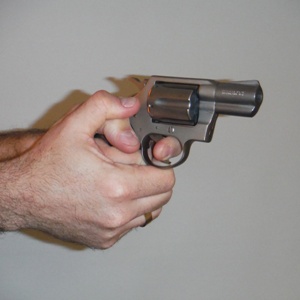
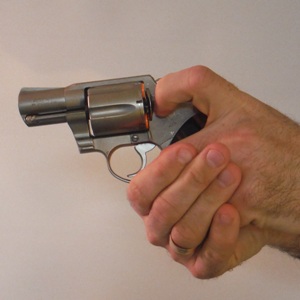
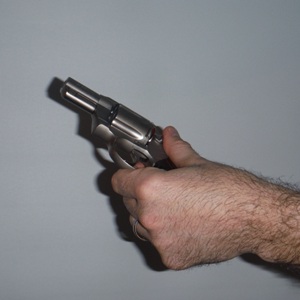
Cylinders and Cylinder releases are a problem for lefties. Cylinders swing out to the left side of the gun, and cylinder releases are all designed to be activated with the right thumb, minus a few rare examples of left-handed revolvers. So that leaves us lefties with three options for releasing the cylinder and opening the cylinder and which one we use depends on the make and model of revolver we are dealing with.
Option 2: Run the left thumb over to push the release while pushing the cylinder out with the support hand thumb. This method doesn’t work well on Colts or as a one-handed technique.
Option 3: Use the middle finger of the support hand to activate the cylinder release while using the support hand thumb to push out the cylinder. This is a 2-hand technique only and also doesn’t work well on Colts.
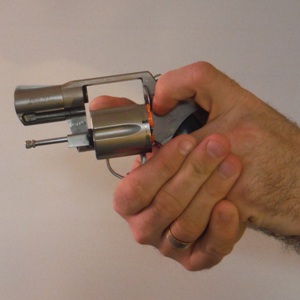
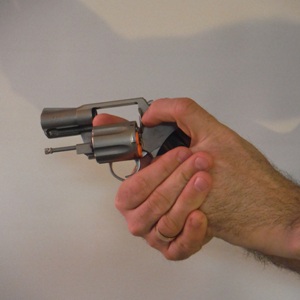
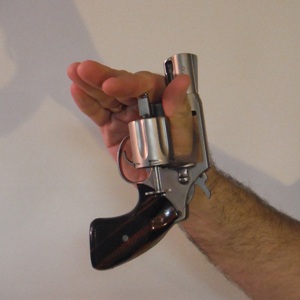
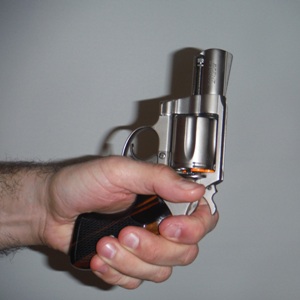
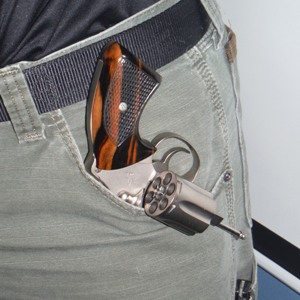
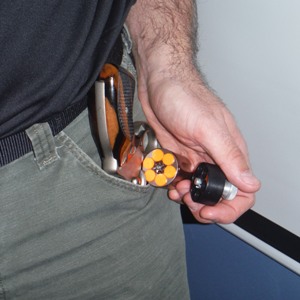
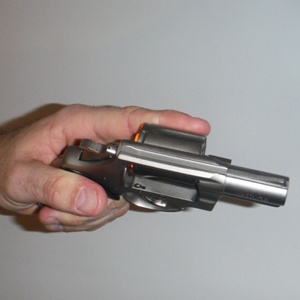
My preferred method is Option 1 because it works on any revolver, particularly Colts like the alloy-framed .38 Agent in these images.
EJECTOR ROD:
Once the cylinder is open, we need to get the old cartridges out. Righty shooters, after ejecting the cylinder with the left middle and ring finger, usually wrap the fingers around the revolver and either use the left thumb to depress the ejector rod, or smack it sharply with the palm of the right hand. These two techniques both have their strengths and weaknesses but they are right-handed techniques, so let’s talk about their left-hand counterparts.
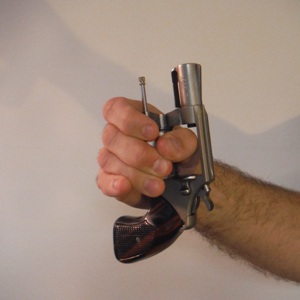
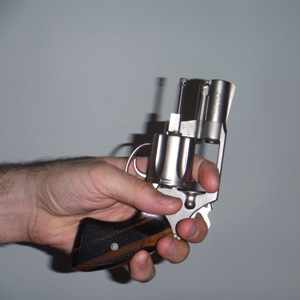
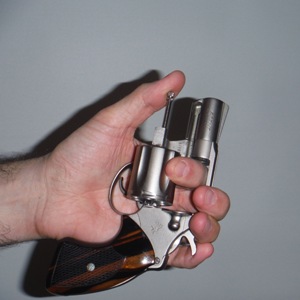
For lefties, we can use the right thumb to push the cylinder out, rotate the fingers up over the ejector rod and pinch the fingers together to the thumb, resulting in the index finger depressing the ejector rod.
Just like the thumb technique for righties, this is fairly fast because we can hit the ejector a few times if needed to clear the cylinder, while retrieving a speed loader, without sacrificing any time. It uses fast, gross motor skills, but is not terribly strong, and that is its main drawback. If you are shooting a magnum or if your cylinder is dirty, it might take a lot of force to eject the spent rounds. Your index finger can probably do that, but there are some circumstances when it may not.
That takes us to technique #2, which is to push the cylinder out with the right thumb as before, then wrap the right middle and ring finger around the cylinder. Release the pistol grip with the left hand, turn the muzzle skyward and smack the ejector with the palm of the left hand.
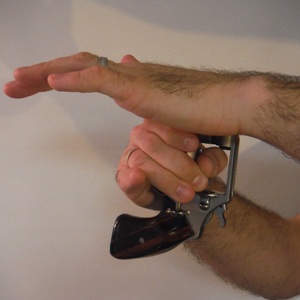
Using palm of the shooting hand to smack the ejector rod should loosen and expel even stubbornly stuck rounds. Of course, this technique is slightly slower, and on rare occasions the ejector can override the rim of a stuck case or rip a piece of the case rim off. If this happens, the gun is down until you find something to jam into the front of the cylinder to force the stuck case out of that chamber. You should only hit the ejector once or twice to clear the cylinder, though with long cartridge guns like .357’s, I have experienced times that it takes more than that for the cylinder to come clean. That slows us way down and tends to point me back in the direction of technique #1 or possibly even a combination of the two: smack the cylinder once to loosen and maybe eject the cases, then while retrieving a speed loader, flipper the right hand on the ejector rod a few times to make good and sure it’s clear. When the firing hand is back in the neighborhood with the speed loader, we move into loading.
LOADING
When I carry a revolver, I carry some extra speedloaders, typically on my strong side, but there’s no-harm cross-drawing a speed loader, particularly if they are kept up in appendix position so you can draw them with either hand.

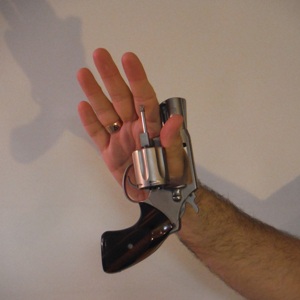
When the gun runs empty, we release and eject the cylinder using one of the techniques above, eject the cases using one of the techniques above, then tuck the elbow of the hand holding the gun and bring the cylinder about 6” to 8” from your chin so you can see the empty chambers with your lower peripheral vision. If you have to take a quick glance to get the speed loader started, do it, but don’t dilly dally, as soon as the rounds line up into the chambers, direct your attention back to your environment and get busy releasing the retention mechanism on the speed loader.
Once that is done, the empty speed loader represents $12.00 worth of junk standing between you and saving your life. Don’t try to retain it or pocket it, just let go of it and let gravity take over while you close the cylinder and get the muzzle back between you and the last known threat.
So… if you think that’s bad, it gets worse! How do we reload a revolver one-handed with the left hand?
…assuming you don’t carry a “New York Reload” that is.
Without addressing the practicality or statistical probability of having to perform a one-handed revolver reload, let’s explore the possibilities, but first:
A WORD OF WARNING: all of these techniques, I am passing on for the sake of knowledge and hopefully to advance the art and science of safe firearms handling. If you decide to attempt any of these techniques, you do so AT YOUR OWN RISK! What follows is an advanced manipulation, that alone really makes it almost impractical as a combative technique, however, just for the sake of argument, here is my proposal on how one might be able to accomplish this. This technique is about how you “could,” not if or when you “should.” Obviously this isn’t going to work in some situations, but if a one-handed reload is the only difference between having a fighting chance or laying back and calmly accepting your fate, maybe it’s worth some consideration.
At no point during any of these steps should we be pointing the muzzle at ourselves. It is conceivable that the first few tries will be very clumsy. I would not attempt this with a loaded firearm until it can be done smoothly and reliably with snap caps. AND… since “all guns are always loaded” we don’t muzzle ourselves even with an “empty” or “snap capped” gun. Understood?
That was the hard part. If you can use a surface to assist you, such as the ground, a table, car seat, etc… it will help, but the idea is to keep as much control and contact on the gun as you can to prevent dropping it or having it taken.
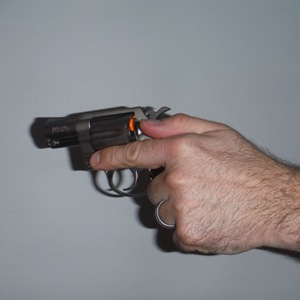
Step 9: Bring the firearm back to firing position and use it to solve any pressing matters as necessary.
That covers the basics of left-dominant two handed and left-hand only manipulations of revolvers. We don’t really need to mess around with revolver malfunction clearance. If a revolver malfunctions due to ammunition, the gun will probably be completely disabled, such as with a squib load, leaving a barrel obstruction that may or may not prevent movement of the cylinder. The other ammo-related problem could be a high primer, poor ammunition fit or some other condition that causes the cartridge cases to wedge between the cylinder and the frame. The result is that the cylinder won’t be able to turn. I experienced this in a force-on-force exercise once with my Colt .38 Agent with Code Eagle rounds. That was fun. I think Colts are particularly sensitive to this though. In this case, your best bet is to unload then reload the firearm with fresh ammunition. This second type of problem can be prevented by “chamber checking” your carry ammunition. Make sure it fits smoothly into the chambers, then see if your cylinder will turn freely with that ammunition.
The most frequent user-induced malfunction I see with revolvers is a chamber “roll-by” that results from pulling the trigger part-way, then releasing it and pulling it again. This typically doesn’t disable the firearm, but may add a few more “clicks” before your next “bang.” These are preventable with good trigger control. Pulling a revolver trigger is a committed action and should be carried out quickly with a smooth, deliberate motion.
That covers everything relevant I can think of on revolvers, and then some. Stay sinister my friends.
*The views and opinions expressed on this website are solely those of the original authors and contributors. These views and opinions do not necessarily represent those of Spotter Up Magazine, the administrative staff, and/or any/all contributors to this site.