
Part 1 An Introduction to Backyard Bladesmithing 101
If you have ever needed a tough, strong, hard-use knife but either couldn’t or just didn’t want to spend a small fortune on one, have you ever considered making your own? With just a few basic supplies, some resourcefulness and old-fashioned ingenuity, you can make a very sturdy, strong, hard-use knife.
Chances are, you already have access to most if not all of what you need either at your own home or very close by. Essentially, what you will need in order to forge your own knife is, of course a forge, an anvil, a hammer, tongs, a selection of suitable knife material, and something in which to quench the blade.

Let’s first look at a forge. A forge is simply a campfire with forced air blown into it. The easiest forge to start with is a ground forge. You start by digging a small ditch about 12 inches wide by about 24 inches long and about 12 inches deep. In the middle of one side cut a narrow channel, starting at the bottom, center of the forge between 12 to 24 inches long angling upward very slightly. This will be for your air source.
Locate a piece of iron pipe about 24 to 36 inches long and between one to two inches in diameter. Place one end of the pipe in that channel at the bottom of the forge with the other end lying in the channel out and away from the forge. Cover the pipe with dirt leaving the end inside the forge slightly uncovered and the opposite end uncovered.

Next you will need to find a source of forced air. The best items for this are a small hair dryer or an air mattress inflator (a battery-powered inflator can provide the advantage of going cordless). Using duct tape or the like attach your forced air source to the outside end of the pipe. (If you are using a hair dryer you will want to keep the dryer setting on low with the “cool” button taped down).
The important aspect of the air source is that it is not too powerful. Too fast and you have a fire hazard; AND, you can over heat and burn your steel.

The best fuel source for forging a blade is charcoal. You do not want to use charcoal briquettes since the binder that is used to hold the briquettes together can stick to your blade material and cause pitting. If you purchase charcoal use natural hardwood lump charcoal.
However, any hardwood firewood will work. Just like getting the grill ready for steaks, your forge fire should burn long enough to have a good base of coals lining the bottom of the forge (in order to properly heat your blade material it must be completely covered by the charcoal).

Now you will need something to pound on. A very good anvil can be made with a sledgehammer head mounted in a small bucket with some concrete. Simply mix up the concrete in a separate bucket. In a small plastic bucket set the sledgehammer head in upright ensuring that it is braced up as level as possible.
Carefully pour the concrete mix into the bucket around the sledgehammer head leaving approximately two inches of the hammer head exposed at the top. Allow the concrete to set overnight. Once the mix has set and cured, cut away any of the plastic bucket so it is level with the set concrete. It should be stable, good and heavy. Any significant sized ballpeen or cross peen hammer will be good for forging, and a pair of vice grips or channel lock pliers will be good for a set of tongs.

A trip to the local junkyard can yield some great blade material. Some of the best items to get ahold of are leaf springs and coil springs from old American-made trucks. These are normally made out of high carbon spring steel known as 5160 (a further discussion will be coming soon regarding the differences in blade steels and what makes certain steels better for various uses).
One caveat with these springs is that they are in a heat-treated state and tempered for their specific use and will require either mechanical means of cutting to size or a technique known as hot cutting. If you happen to find – or have – an old tire iron you’re in luck since you can avoid most of the cutting requirements. The tire iron is also made from either 5160 or another high carbon steel known as 1095 – another great blade steel.
Another caveat; there are a lot of people who make some great looking knives out of railroad spikes. These knives do look good but make better letter openers than knives. The carbon content in these railroad spikes is not high enough to make a good knife.
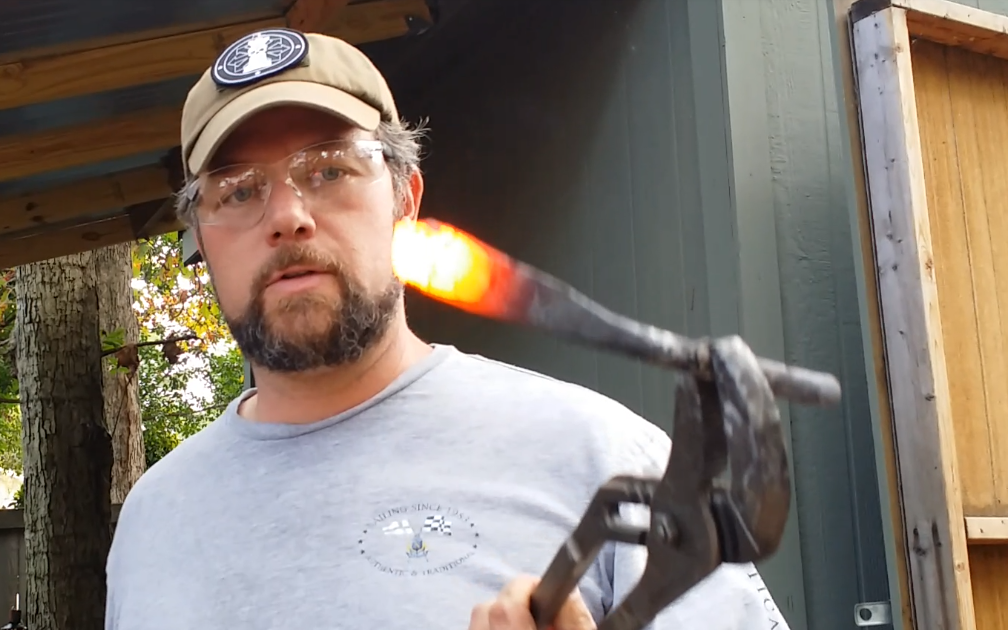
Now that you have a forge, and anvil and some blade material, it’s time to get to work. One more item you will need as you forge is a magnet. I will explain what in a minute. Once you have a good base of coals you will want to bury your blade material until it is completely covered in the coals. Provide the forced air into the base of your force and keep an eye on your steel. As it heats up it will begin to change color from black/grey to a dull red then to a nice bright orange.
You will not want to get the steel hotter than this or you will actually begin to burn the steel. Once your steel has reached a bright orange, it is at a good forging temperature. Use your tongs to remove it from the fire and begin to hammer the steel into the shape you desire. As you hammer, the steel will start to cool – comparatively speaking – and lose color. Once the color returns to a dull red or feels less pliable under the hammer it is time to put it back into the fire.
Again, completely cover with fuel, add the forced air and bring the steel back up to the bright orange (you may need to move the steel around in the coals to produce an even heat. Once you forged as close to shape as possible, it is time to anneal the steel.

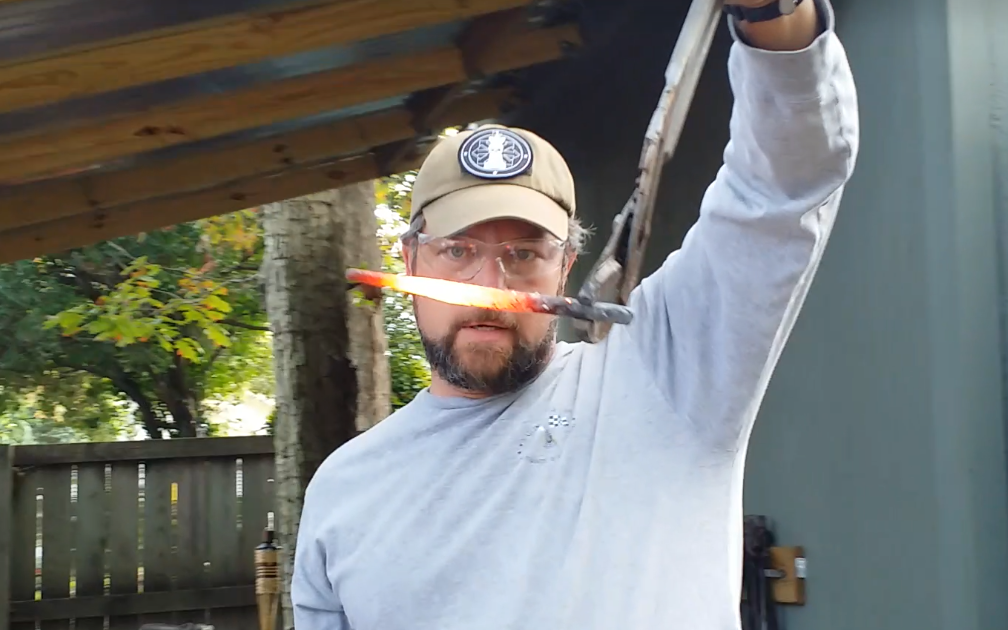
Forging introduces a great deal of stress into the steel. In order to relieve this stress you must anneal the steel, which will soften it and allow it to be shaped and manipulated by files for that final shape. To do this you heat the steel up to a bright red color, remove from the fire and allow it to cool in still air until it is cool enough to handle. Repeat this two more times. Once you have annealed your steel you can file it down to its final shape.
A lot of work has occurred up until this point; now the magic happens. You will harden and temper your blade to give it its strength and edge-holding capability. Time to fire up the forge again. At this point you will need a metal bucket or stockpot; something to hold about a gallon of vegetable oil. This will be your quenchant. Do not use water. Straight water is too harsh of a quenchant, will cool the steel too fast and can cause breakage.
Once a good base of hot coals are established, places your blade into the fire and cover with fuel. Slowly bring your blade up to a bright red color. Begin testing the blade with your magnet. You will soon notice that at a certain temperature/color the magnet will no longer be attracted to the steel. This is known as the critical temperature.
Once you have reached this temperature, observe the color and do your best to maintain the steel around that temperature for about two to three minutes. Now it’s time for the quench – and some quick action (it may be a good idea to practice this a few times considering the importance of this step). Remove from the fire and QUICKLY plunge the blade straight down into the oil. It may flame up so be careful.

Once the “sizzling” and bubbling stops remove from the oil and check for warping in the blade. For about a minute or two you can straighten out any warping in the blade using pliers and/or a vice. Once the blade has completely cooled it will be very hard but will also be very brittle. You can check this hardness by taking an old file and scraping it across the edge of the blade.
If it skates off the edge easily without biting into the steel then it has been hardened properly. Now you will need to temper the steel in order to draw out the brittleness but still “leave in” the strength. The easiest way to perform this is with an old toaster oven. You could do this in your kitchen oven as well.
Preheat your oven to 350 degrees (you can have this step done before you perform the quench). Place your blade into the oven and let is sit in there for an hour. After an hour, remove the blade and let it cool to room temperature. Repeat this step two more times. After the third time you will notice a gold color in the steel. This is what you want.
At this point you can construct the handle as you see fit and sharpen your new knife (A follow up article regarding the metallurgy involved in what you just performed is coming soon). This is just one of many methods to make your own knife. Whether it’s for a hobby or out of necessity, with some ingenuity and imagination you can make a knife that is strong, sharp and will give you years of reliable use.
Part 2 Introduction to Knife Forging Tools
The tools shown in this video clearly are basic instruments and they can be purchased at most hardware stores. The art of making knives, daggers, or swords is called Bladesmithing.
Travel around the museums such as those in Williamsburg Virginia and you can find tongs and anvils from bygone days. Old forges can be found in historical locations in the Wild West and Northern California where they old miners panned for gold. Old school tricks are being used today. The craft of blacksmithing has become a useful hobby for many with backyard space and time to spare.

In order to make these things, a bladesmith needs a hammer, an anvil, a forge and other smithing tools. The art of making knives can be relatively inexpensive and a very rewarding hobby.
Tongs, vises and clamps also come in very handy. Vises and tongs should be durable enough because they will hold the metal being hammered.
Now you will need something to pound on. A very good anvil can be made with a sledgehammer head mounted in a small bucket with some concrete.
Simply mix up the concrete in a separate bucket. In a small plastic bucket set the sledgehammer head in upright ensuring that it is braced up as level as possible. Carefully pour the concrete mix into the bucket around the sledgehammer head leaving approximately two inches of the hammer head exposed at the top.
Allow the concrete to set overnight. Once the mix has set and cured, cut away any of the plastic bucket so it is level with the set concrete. It should be stable, good and heavy.
A good anvil can be purchased for about $200.00 dollars but there’s something rewarding to be said for making an anvil out of concrete and an old sledge hammer-head.
In the end, the better the tool, the easier it is to craft a quality item. Any significant sized ball-peen or cross peen hammer will be good for forging, and a pair of vice grips or channel lock pliers will be good for a set of tongs. It’s up to you how much you want to invest. These videos just give you a small peak into a really interesting world of old school techniques.
You can pick up metal from many car junk yards in order to select your high-carbon steel. If you want a durable cutting edge than you’ll want to forge out of high-carbon.
Industrial equipment and scrapped automobiles are a good place to look for your steel in this wrecking yards. Great place to start as you begin your forging journey.
- Anti-roll bars
- Push rods
- Starter springs
- Suspension coil springs
- Torsion bars
- Vehicle Leaf Springs