
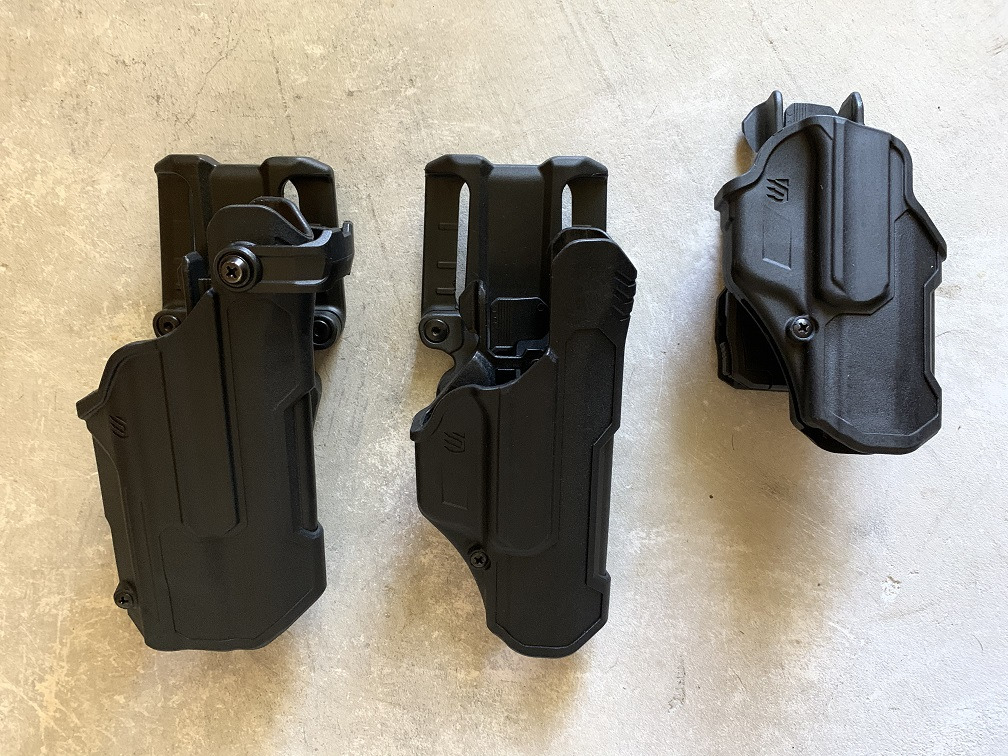
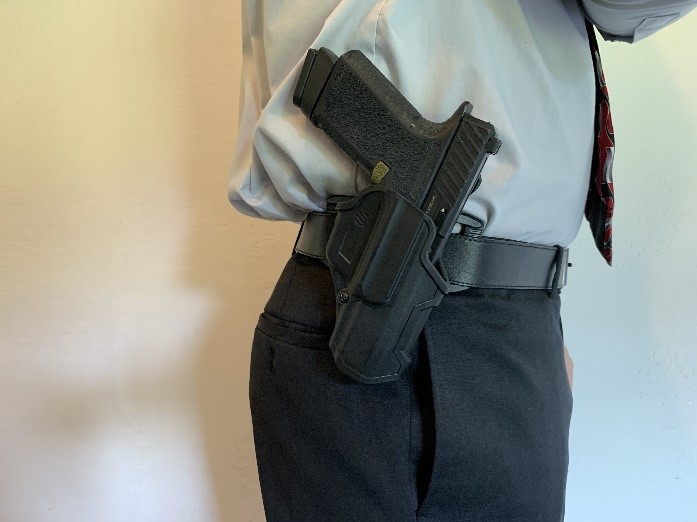
Two months ago, I did an article on the T-series level 2 retention holster from Blackhawk. The exact model was the L2D non-light bearing holster. I was extremely pleased with the design and felt it met all their claims as well as some additional requirements I look for in a holster from a combatives perspective. At the end of the video and article, I finished up by stating that I would really like to get ahold of the level 3 design in a light bearing configuration. Blackhawk not only agreed and sent me one but also included their latest design the L2C model which is a compact version of the L2D I originally reviewed. This article will focus on my experience with these two designs.
Similarities and Differences:
In an effort to not rehash everything I covered in the first article on the L2D I will just say that all 3 designs (L2D, L2C and L3D) are of the same quality, design and configuration for the most part. All feature the quiet draw composite material, all are extremely sturdy, and all feature the “master grip” release for the retention mechanism. The differences between them are subtle but essential in my opinion for distinguishing their particular areas of operation.

L3D Light Bearing (Left) – L2D Non-Light Bearing (Middle) – L2C Compact (Right)
L2C – Compact Level 2
The L2C model comes with two features that were unique to this model. The first is the mount. There are two mounts that are included with this model. The Quick Dual Release mount or QDR as Blackhawk refers to it, is a mount that clamps down on the belt and can easily be removed by depressing two tabs on the side. If you are familiar with the Tech-Loc system from Bladetech, this system is very similar. The second mount option that is included is the Belt Loop mount.
Belt Loop Mount (2-3/4” belt) on Top – QDR Mount (up to 3” belt) on Bottom
This is actually a pretty slick mount. It has been designed with a cant in the front that forces the grip of the weapon closer to the body. This, in conjunction with the fact that it allows the pistol to sit a little closer to the body, actually gives the pistol the ability to be concealed in a 3 to 4 o-clock position outside the waistband. This is pretty interesting because this means that the L2C would be the first concealed holster that I am aware of that meets duty standards. Depending on the build of the person, t-shirts are probably not going to be an ideal cover garment but I threw on my complete setup for protection work and it worked out great. Both mounts are designed to allow the pistol to sit up higher on the body. Essentially the ejection port sits about level with the top of the belt. This contrasts with the L2D and L3D models which have a slight drop offset which I mentioned in my first article.
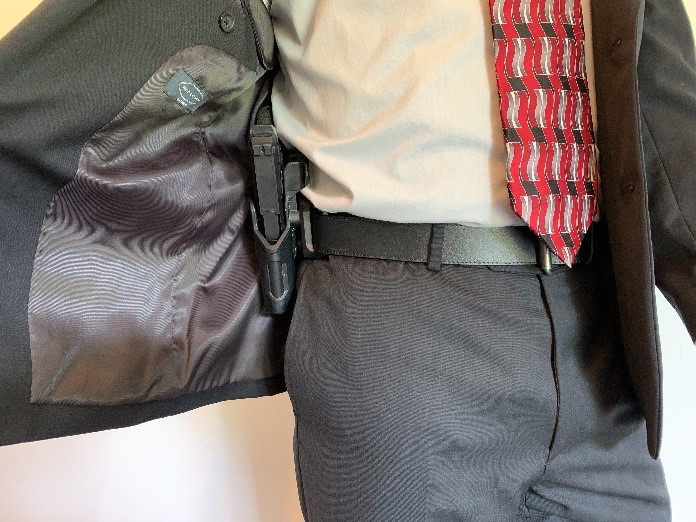
L2C with Belt Loop Mount for concealed OWB use
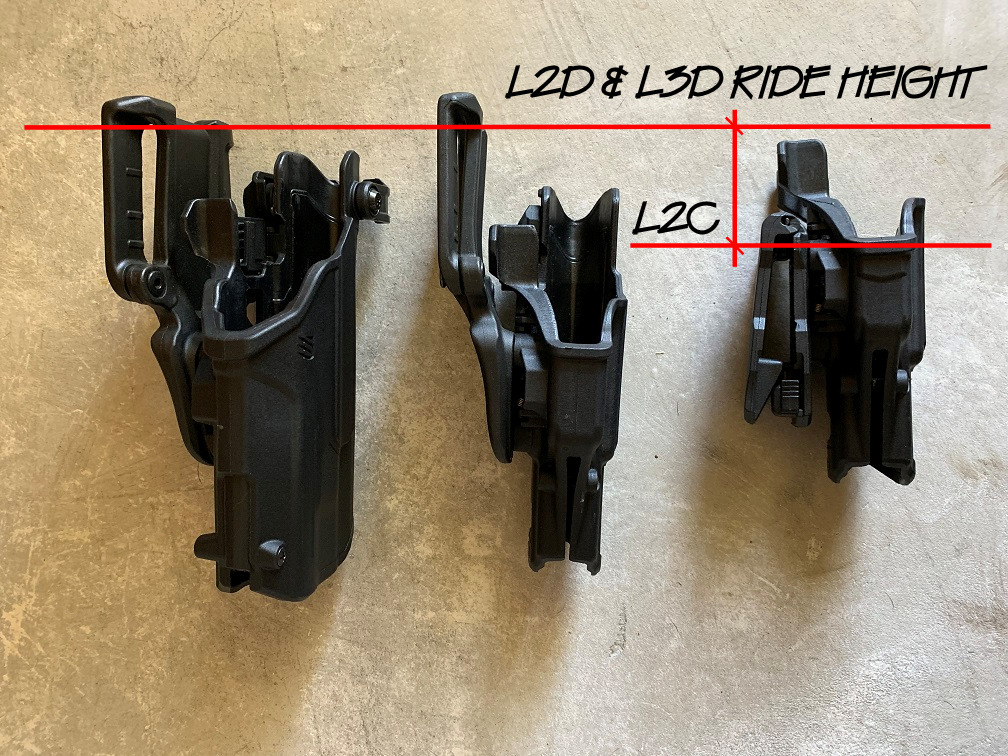 Difference in ride height is approximately 4.0”
Because of the higher positioning I found it a little tight for me to utilize with a plate carrier type body armor. However, with soft armor it worked out just fine. This actually makes sense to me since I would characterize the L2C with QDR mount as a design to be utilized by uniformed officer’s vs tactical team members and the L2C with belt mount as an ideal setup for executive protection or professionals where an open front cover garment would be worn. The higher position also puts the pistol in an ideal position to be defended with the forearm and elbow in holstered retention type scenarios. This is a technique that is taught in a lot of circles and I feel is still valid.
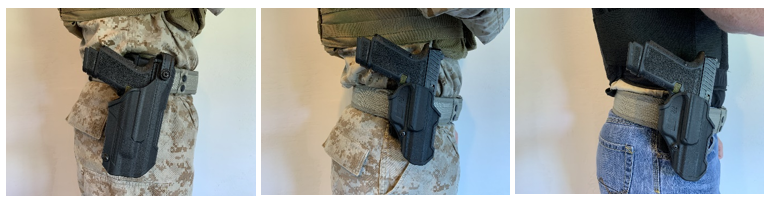
L3D w/ plate carrier – L2C w/ plate carrier – L2C w/ soft armor
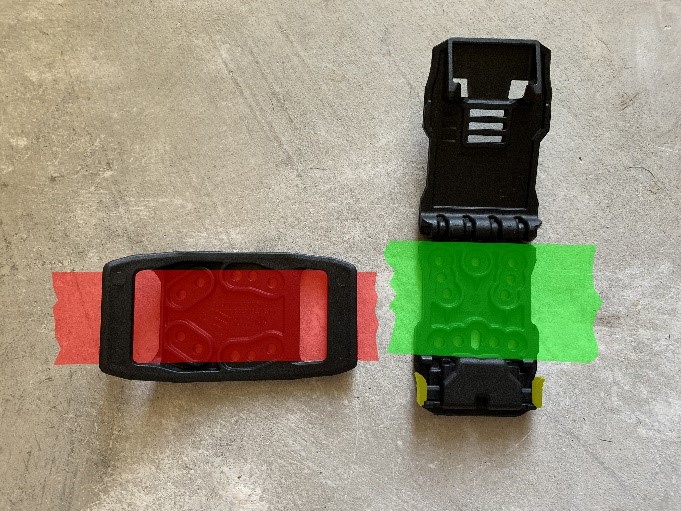
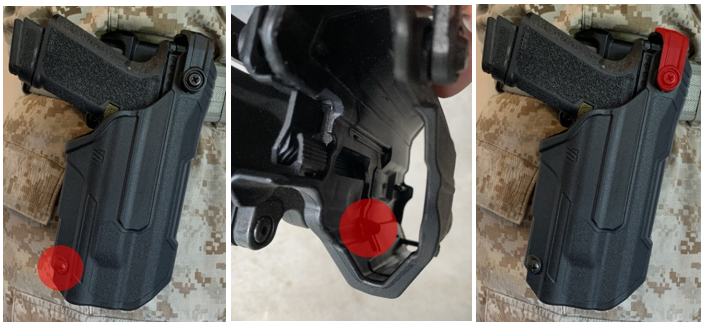
Another feature that distinguishes the L2C from the others is the shell. The shell itself has an open front which according to Blackhawk was put in there to allow for the pistol to be reholstered easily, funneling the pistol back to the holster without the user needing to look down. However, this open face also helps offset the increased ride height of the weapon by allowing the pistol to be oriented downrange sooner. This is a technique I drill into the students in all my classes. The moment the muzzle clears the holster it needs to be oriented downrange. Doing so shaves considerable time off the draw and can be very beneficial at contact distances. Additionally, the open face also allows for the utilization of an optic, which has become all the rage. The current designs on the L2D and L3D do not allow for this at this time.

L3D and L2D in Red – L2C with QDR in Green
L3D-LB – Duty Level 3
Getting ahold of the L3D was something I was really looking forward to. I had some questions on how they were accomplishing the level 3 configuration and what the release mechanism would be. To understand this, I feel it’s important to understand the levels of retention on the holster in general.
The first level of retention (level 1) on most holsters is going to be friction. The pistol is held in place in the holster via friction, in most cases with a tension screw that allows the end user to adjust as needed. In the day of the “Guchi Glock” having a tension screw is ideal as nearly everyone modifies their pistols in one form or another.
The second level of retention (level 2) is accomplished via a bar the locks onto the rear of the weapons mounted light (WML). This is in contrast to the non-light bearing models which utilize a standard trigger bar that locks onto the trigger guard. In the case of all models in the T-series line, the retention release for the second level of retention is activated by establishing a “master grip” on the pistol and depressing the release with the shooters thumb. On all models this release is hidden and guarded with material that make it extremely difficult for attackers to activate but extremely easy for the end user.
The third and final level of retention (level 3) is accomplished via a hood that locks down over the rear of the pistol. This provides an extra physical barrier to the removal of the pistol in conjunction to the weapons mounted light locking bar.
Retention Screw – WML Locking Bar – Retention Hood
Now here is where it gets interesting… There are pros and cons to adding in additional levels of retention to a holster. The pros are self-evident in that they provide redundant protections to the pistol being removed and utilized by anyone other than the end user. However, the cons are two-fold. One, whenever you add an additional layer of protection you also tend to complicate the draw process. For example, some of the earlier level 3 duty holsters I had experience with required the depression of a thumb device while pressing the pistol down into the holster and then rocking the pistol forward. This provided for an extremely safe design, but it was also extremely complicated and under duress can become a point of failure. The second con is that by adding additional layers of protection you also have a tendency to slow the draw process down. Both of these cons were viewed as necessary evils in a field that requires the end user to be in close proximity to potential attackers.
Draw Fail from Triple Retention Holsters
The effects of a complex retention mechanism
However, with the L3D the end user is able to gain all the stated benefits of additional protection without any of the negative drawbacks that so often plague them. In my original article I tested the L2D holster against my average draw time from a AIWB Bravo Concealment holster. The holster itself would be considered a level 1 with friction being the only method of retention. My average draw time was a 0.75 to first shot cold. I then compared it to the level 2 L2D model. There were no significant impacts on my draw time at all. I was still achieving the same draw times but now with the added benefit of an extra layer of protection. When I received the L3D holster I repeated the tests to determine what the impact would be on overall draw time. There was NO significant impact whatsoever. My draw times were still in the same area of 0.75 seconds from a level 3 retention holster, which in my book is smoking fast.
The reason there were no adverse effects on the draw time were two-fold. First, the master grip design mentioned in my first article is in place which means, as long as you’ve got good fundamental technique in drawing your pistol you can’t go wrong. I also found this feature to be a nice additive for training new shooters to achieve a consistent master grip from the holster, but that’s another article. The second reason there were no adverse effects is the fact that the release of the level 2 locking bar and the level 3 hood are all coupled into the same release mechanism. Simply pressing the release and letting go will disengage the hood, whereas depressing and holding the release will disengage both retention mechanisms.

Retention Mechanism
1st Level (Yellow), 2nd Level (Green), 3rd Level (Red)
This means that the level 3 is no more complicated than the level 2, which in turn means that the additional layer of protection provided by the level 3 comes at absolutely no cost in time or simplicity. This is a huge advancement in retention mechanisms from a combatives perspective where contact distances require that drawing is simple and fast. I tested this theory in my last open enrollment class I taught in Arlington, TX and took all 3 model holsters and allowed each of the students to try them out at will. Some chose the retention holsters; others chose the concealment non-retention types. After training for an entire day, I noticed no failures to access on the Blackhawk retention models and these were civilian students who had no previous tactical or force on force experience. This was a true testament to the ease of operation of these holsters.
Conclusion:
If it seems like I am a Blackhawk “fan boy” it’s because as of now I am. There are obviously certain models and designs that are better suited for particular operational environments than others. But the T-series duty use holsters I felt were great and as far as I am concerned will have an ongoing presence as I travel and teach classes on combatives in a weapons-based environment.
Material Disclosure
I received this product as a courtesy from the manufacturer via Spotter Up so I could test it and give my honest feedback. I am not bound by any written, verbal, or implied contract to give this product a good review. All opinions are my own and are based off my personal experience with the product.
*The views and opinions expressed on this website are solely those of the original authors and contributors. These views and opinions do not necessarily represent those of Spotter Up Magazine, the administrative staff, and/or any/all contributors to this site.
I use the Blackhawk T-Series L3D Holster, I have no combat experience, read multiple articles of police and military using Blackhawk and decided to flatten the learning curve. I have found & tried leather retention holsters and then found Blackhawk. I no longer use manufacturer belt attachments but have graduated to the QDR. I want to attach the female adaptor of the Quick Disconnect System kit with a T-SERIES QUICK DUAL RELEASE BELT LOOP and make a platform to which the kit could attach for placing on the belt.
So far this has been unsuccessful.
The holster is phenomenal and the belt attachments function properly, just not for me.